Introduction
DeNovix DS-Series instruments with microvolume mode (DS-11 Series, DS-8X, DS-7, and Helium) use hydrophobic sapphire windows along with stainless steel and quartz optical fibers as sampling surfaces. Wiping the sample from both the upper and lower sampling surfaces with a dry lab wipe after a measurement is generally sufficient to completely remove any trace of the previous sample. However, if a sample is not adequately wiped away and dries down onto the surfaces, problems with subsequent measurements will occur.
Blanking an instrument with dirty sampling surfaces (either top, bottom or both) will result in measurements of erroneous absorbance values, such as a negative spectrum or sample concentrations being calculated as lower than the actual values. Updated versions of the instrument software detect significantly negative spectra and trigger an error message to appear and advise cleaning.
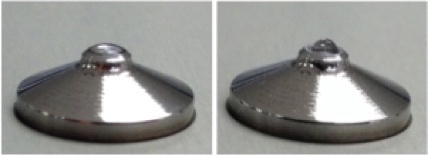
Dirty sampling surfaces can also cause issues with the surface tension of a sample on the measurement surface. If a protein or bacterial cell culture sample has been left on the microvolume surfaces, samples may start to lie flat on the surface instead of beading up, as shown in the Figures 1A and 1B. This behavior may also arise when measuring samples in a buffer containing an alcohol. In these cases, a thorough cleaning of the sample surfaces is recommended.

Sample Surface Cleaning Procedure
If an error message warning about negative spectra appears after a measurement, or if sample concentrations are lower than expected, follow the cleaning procedure below:
Using dH2O should be sufficient to clean the sample surfaces. In some cases, it may be necessary to repeat the above steps multiple times.
Note: Using 0.5 M HCl in the procedure above will make it easier to remove dried samples but is not absolutely necessary.
Note: The sampling surface is located near the front of the instrument. Some DS-Series instruments may have an optical surface at the back near the arm hinge base. These should be cleaned as described above if someone inadvertently pipettes sample onto this surface. The raised silver-colored ball located at the center top of the instrument is not a sample surface, but instead is the head of the arm adjustment screw. Keep this area dry and clear of dust and debris.
21-MAR-2025


